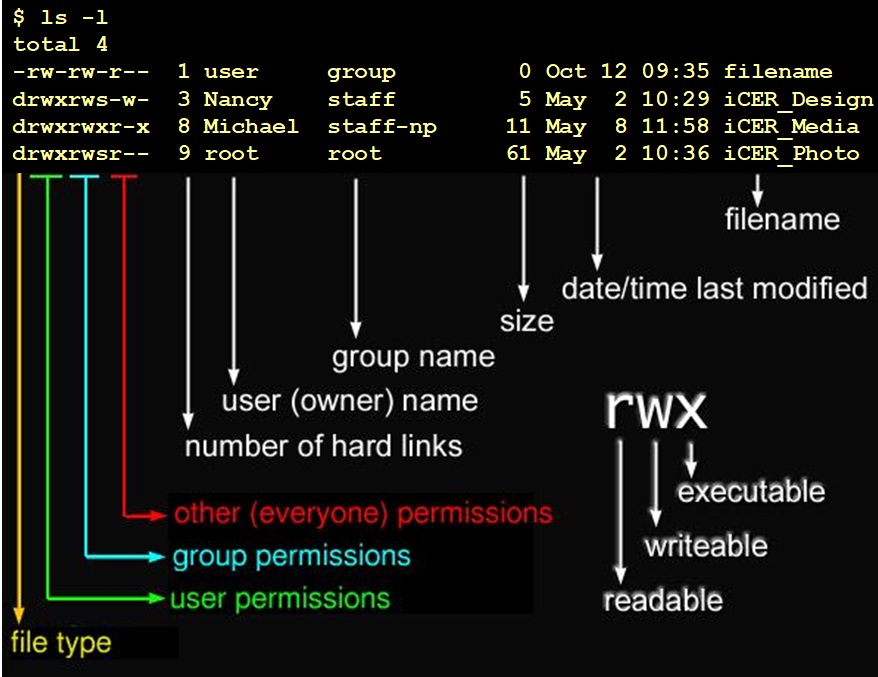
Managing file permissions on HPCC
This is a list of techniques to manage file permissions and groups on the HPCC. For background on the concepts, please see the page on file permissions.
Displaying permissions of files and directories with ls -l
To display permissions in the current directory, run:
1 | |

You can also display the permissions of an individual file or directory by running:
1 | |
For example, you can check the permissions of your home directory:
1 | |
Changing file permissions with chmod
In the normal UNIX security model, there are three levels that are
evaluated when considering file or directory access: user owner, group
owner, and everyone else on the system. These types are typically
referred to as user (u), group (g) and other (o). Only the owner
of a file or a directory is allowed to change its permissions or the
group name (to one of the owner's groups).
Change user permissions
To add all permissions for the user owner, run the following command:
1 | |
Note that any file you create will already have the rw permission for
your user account so that you will have the "read" and "write" permissions respectively.
However to have a program script able to be run from the command line, you need to change the 'execute', or x, permission with
1 | |
Changing group and other permissions
To allow anyone in the group that owns the file to be able to read that file, change the group read permission:
1 | |
To allow anyone in the group to read and write the file, you can change the read and write permission
1 | |
If you have a file that is currently read and writeable by the group (g+wr) and you want to make it private, remove those permissions:
1 | |
To add the ability for other users to write to a file or directory (this allows all users on the HPC to see and read this file if it's in a shared folder which we don't recommend).
1 | |
Changing group ownership with chgrp
To change the group ownership of a file or a directory, simply run
1 | |
where <GroupName> is the group name which you would like to change to
and <FileName> is the name and path of the file or directory.
Working with non-primary groups and permissions
Switching groups with newgrp
If you have more than one group associated with your account, you can
switch which group owns the files created by default with the newgrp
command: newgrp myothergroup. If you need to do this frequently, you
can contact HPCC staff to change your primary group or see the page on changing your primary group.
Changing default group for new files with the set-group-ID bit and chmod
You can also change the default group for new files created in a
directory by setting the set-group-ID setting. The /mnt/research HPCC
Research file share spaces have this setting set by default.
To set the set-group-ID bit on a directory:
1 | |
To remove the set-group-ID bit on a directory:
1 | |
Other special permissions
There are other group permissions beyond the scope of this document, primarily the set-user-ID bit and the "sticky" bit. For more information about special permissions, please review the GNU documentation, available on any HPCC system:
1 | |
Filesystem-specific differences
Home
Your home directory has default permissions that allow only you to have access. Other users, whether they are in your primary group or not, are not allowed access to the contents of your home directory by default. If you wish to allow other users access to your home directory, you will need to change permissions on it.
To allow every member of a group access to read your home directory, use:
1 | |
It is strongly recommended that you do not allow all users to read the contents of your home directory. Instead, to allow users outside of your UNIX group to read contents within your home directory, it is suggested that you create a subdirectory within your home directory that is readable by all users, and then set the execute permission on your home directory to allow users to access the subdirectory. For example:
1 2 3 4 5 6 | |
To allow every user outside your UNIX group to read your home directory, use (NOT RECOMMENDED):
1 | |
To allow world-wide read access to your home directory (NOT RECOMMENDED):
1 | |
Sharing a single directory inside your home directory
If you wish to share only a single directory in your home directory and keep all other contents private, you can use the following technique (This is the recommended method for sharing home directory contents with users outside of your UNIX group):
1 2 3 4 5 6 7 8 9 | |
Scratch
Directories are created as private to you by default. If you do not wish
this to be the case, you can use the technique for sharing a single directory in your home directory above.
Note if there are other directories above your shared directory (e.g. it's a sub-sub-directory like ~/project/data/shared), then every directory in the path will need the execute bit set for
everyone.
TMPDIR space
Directories are created as world-readable by default, but the scheduler
deletes the contents of $TMPDIR after a job exits. If you require
additional security for this temporary space, manually setting the
permissions of $TMPDIR is necessary. Here is an example to mimic the
security of home directory space:
1 | |


